
by John Barsness
I‘VE BEEN formally testing rifle scopes for over a quarter of a century, starting around 1990 when Craig Boddington, then the editor of Petersen’s Hunting, hired me as the magazine’s first optics columnist. (Both Craig and I have since gone on to other things, including becoming more “mature.”)
Back then scope-testing varied considerably from today, partly because scopes have changed. First, in 1990 some scopes still weren’t sealed against moisture getting inside, and some that were supposedly sealed still leaked. Thus part of the testing involved submerging scopes in warm water, with their turret caps removed, to see if the warmed gas inside bubbled out.
In 1990 the standard test of scope adjustments was “shooting the square.” This meant getting a bullet to land on paper at 100 yards, then clicking the adjustments between subsequent shots, so each would land at the corner of a square. Generally the square was about a foot on each side, so with ¼-inch adjustments we’d click the elevation turret 48 times, take a shot, then click the windage turret 48 times, then take a shot. This would be repeated until groups formed at the corners of the square, and we’d judge the adjustments by where they landed, and the size of the groups (were they as small as when the rifle was sighted-in and the turrets not touched?).
However, most scopes back then didn’t have particularly good adjustments, and some didn’t even have clicks, but friction adjustments with hashmarks. Mostly of us weren’t all that concerned with the accuracy of adjustments anyway. Instead we mostly just wanted to get the damn thing sighted-in, then leave the adjustments alone. This was often an adventure involving at least a box of ammo, often punctuated by tapping the tops of the turrets with an empty case to make sure the adjustment “took.”
Finally we’d compare the scope’s view with other scopes. I did this by lining up several scopes in front of the picture window of my living room around sunset. At the time Eileen and I lived in the country, and the window faced a hillside about 400 yards away, cut by juniper draws where mule deer lived, so we’d often have actual game animals to look at while comparing scopes. However, this testing was only comparative, not absolute, so for quite a while a scope I kept a scope I didn’t really like (because it had turret placements making it almost impossible to mount) simply to compare its view to other scopes.
Things have changed considerably since then, both in scopes and my testing. First, all the scope brands that weren’t sealed in 1990 were sealed by 2000, and today I don’t know of any that aren’t. Also, by 2010 it had been years since the dunk-test revealed a leak in any scope, so I quit doing it.
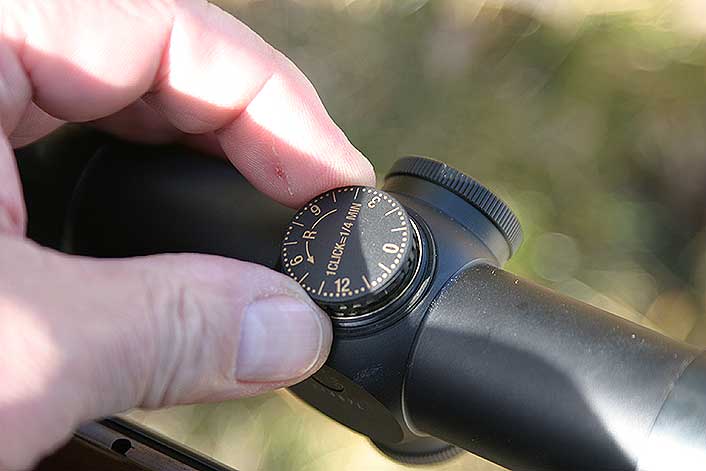
By 2010 shooting the square also became obsolete, because so many shooters were only interested in how well the elevation turret adjusted the scope for long-distance shooting. For “dialing” scopes, the best initial test is sighting-in on a 100-yard target, then cranking the elevation turret up and down, taking shots in between. This tests both the accuracy of the clicks (these days more often ¼ MOA or .1 milliradian than ¼ inch), and how well the bullet holes return to the same place, whether the 100-yard zero, or other heights above zero.
Some shooters shoot at targets three feet tall during this test, but if you’re simply a hunter who wants to shoot more than 400 yards, a foot is usually plenty. As an example, let’s use a typical 180-grain boattail started from a .30-06 at the traditional 2700 fps. When sighted-in two inches high at 100 yards, cranking the elevation dial up another foot will bring point-of-impact very close at 600 yards.
I usually perform a 2-foot test at 100, which with the same .30-06 load is good to at least 800, or with faster, high-BC bullets to 900-1000. My primary scope-test rifle is a superbly accurate Heym SR-21 in .300 Winchester Magnum, the test load the 210-grain Berger VLD with a maximum load of Retumbo. When sighted-in at 1000 yards, the 100-yard zero is around two feet high.
The muzzle velocity of this load is around 2950 fps, and it groups into one ragged hole at 100 yards. Recoil is right up there, and combined with the fine accuracy any scope problem is quickly revealed. They occur pretty often, too. Since starting to seriously test scopes, I’ve seen 17 brands (not individual scopes) fail simply from shooting on various rifles, in chamberings from .17 HMR to .458 Lott, but probably a third of those scopes have been killed by the Heym since it was purchased in 2009.
However, to really make sure how a scope’s working, the mounts have to be rock-solid. Among the weak points in most scope mounts are the base-screws, usually 6-48 but never larger than 8-40. This means a scope weighing 20 ounces or more, and mounts weighing up to half a pound, depends on four screws measuring no more than .16 inch in diameter, and that’s at the outer edges of the threads, not the solid portion between the threads. As a result the mounting bases themselves can shift slightly, unless some technique is used to keep them firmly in place. (The ideal, of course, is stout scope rings attaching directly to the action itself, as they are on Ruger Hawkeye and CZ actions, but this isn’t always possible, and can create other scope problems, as we shall see.)
Consequently, one of the things I do regularly when mounting scopes on any rifle that recoils more than a .223 Remington is apply blue Loc-Tite not only to the base screws but the bottom of the bases. Other stuff also does the job, such as fingernail polish, but still allows the screws and bases to be removed, but if I really truly want the bases to stay put they’re attached with epoxy. That’s how the Talley steel bases are attached to the Heym, and the steel Weaver bases to my Mauser Mark X .375 H&H. Even epoxied bases and screws can be removed by heating them up — also necessary for red Loc-Tite — but they do not shift.
However, on most rifles blue Loctite works fine. This is how I attached the NULA scope rings to Eileen’s first NULA rifle, a .270 Winchester acquired in 1991. After working up a very accurate load with 130-grain Nosler Partitions and sighting the rifle in two inches high at 100 yards, it stayed sighted-in for a decade.
Eileen would go to the range each year before the fall hunting season, whether it started in Montana with antelope or in Quebec with caribou, and shoot one round. A hole would appear two inches above center on the target, and she’d go hunting. The only reason the rifle went out of zero was the 2-7x variable eventually went belly-up — and yes, it was a highly-regarded brand, and not the only scope of that make killed by a NULA.
The NULA mounts, by the way, were the original version (designed by Melvin Forbes) of what are now known as Talley Lightweights. Some shooters don’t believe Lightweights can be very stout, since they’re aluminum. They may not be as stout as steel Talleys, or steel “tactical” rings on rails, but if attached firmly to the rifle they work very well. Eileen’s .270 spent a lot of time during those years bouncing around from several Rocky Mountain states to the Arctic, yet stayed sighted-in.
But a second factor in mounting scopes that can also affect adjustments is ring-tension on the scope. Too many people over-tighten ring-screws, the reason I follow manufacturers’ recommendations for screw-torque. Some blue Loc-Tite doesn’t hurt if you’re nervous about ring-screws torqued to “only” 20 inch-pounds working loose, but in my experience degreased screws torqued correctly won’t work loose, even when bounced around in Toyota Land Cruisers in Africa, or inside horse scabbards.
The rings can also cause problems if they’re not aligned with the bore.
I test rings for correct alignment partly with rods made for the purpose from D’Arcy Echols, the well-known custom riflemaker, and Jerry Schmidt, an avid Montana shooter (www.parabola-llc.com). If the rings are out of line, I adjust or lap them, but one of the easiest ways to make sure the rings aren’t stressing the scope is to use Burris rings with their Signature polymer inserts.
Even if the rings aren’t bending the scope slightly, the scope also needs to point the same basic direction as the bore. Otherwise even the best scopes can adjust erratically, because the turrets aren’t centered on the erector tube inside the scope.
First, the scope’s reticle needs to be centered, which can be accomplished by counting turret-turns, or pressing the objective bell against a mirror and looking through the scope. Normally you’ll see two identical reticles, spaced somewhat apart, one the real reticle and the other it’s reflection in the mirror. Turning the scope adjustments will bring them together, and the reticle will be centered — at least theoretically. The mirror method depends on the objective bell being absolutely square with the center of the scope, and in some scopes it isn’t, the reason I usually count turret-turns.
You can check scope/barrel alignment by bore-sighting the scope while mounting. While it can be done in most rifles the old-fashioned way, by looking through the bore, a collimator of some sort makes the job easier. However, not all collimators are equal, and very few shooters check them for accuracy.
To be of any use, collimators must be also be checked for alignment, and the easiest way is to try them on sighted-in rifles. You’ll soon discover that not every rifle shows the same alignment with a collimator, but finding an average is far better than simply guessing your scope is lined up with the bore.
My range-tests take place only after the scope is firmly mounted in reasonable alignment with the bore. Otherwise you’re often testing the mounts and their alignment, not the scope.
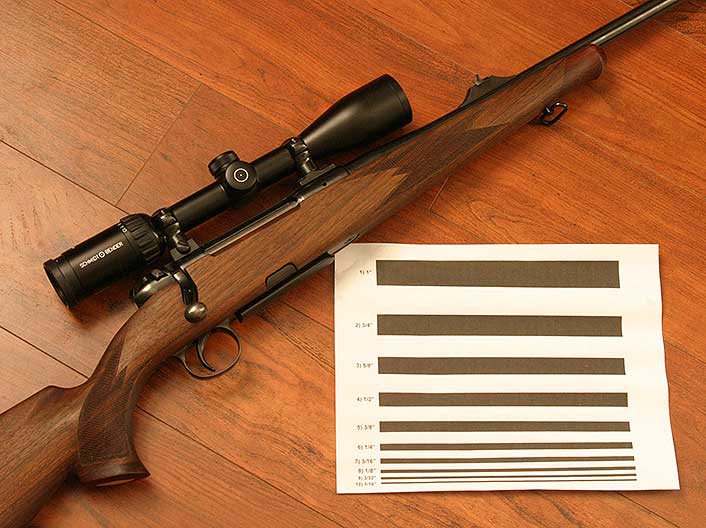
These days I perform optical tests with a chart of my own design, with 10 alternating black-and-white lines, starting at one inch wide at the top of the chart, then shrinking down to 1/6th inch wide at the bottom. The testing’s done on dark nights, with the chart 25 yards away from both the scope, and an incandescent, 100-watt General Electric bulb. (I stocked up on ‘em before incandescent bulbs were outlawed, and have enough to keep scope-testing until my eyesight gets senile.)
The scopes are all set on 6x, because magnification has a definite effect on perceived brightness and sharpness, and rated by the smallest line that can be seen. This means the scope must be absolutely still, so it’s placed on a rest. Obviously, the black-and-white chart does NOT test color rendition, but color perception varies considerably among people anyway. I also only test sharpness around the center of the field-of-view. A lot of shooters make a big deal about scope’s view being blurry around the very edges, but we don’t aim with the edges.
So far all scopes have rated between 5 (the 3/8-inch line) and 8, the 1/8-inch line. The 5’s have all been old scopes with uncoated lenses, and until recently the 8’s were all scopes costing $1000 or more — though not all $1000 scopes rate an 8. (The exception was a recent Tract Toric BDC 3-15×42, priced at $674, made possible by Tract’s direct Internet sales, which bypass the profit taken by the layers of typical retailing.)
Modern multi-coated scopes average around 6, the ¼-inch line, and in reality that’s more than adequate for most hunting, one reason I’m far less concerned about the optics rating of a particular scope than it’s mechanical reliability. Which is exactly why I test scopes on a .300 Winchester Magnum with 210-grain bullets at almost 3000 fps. Heavier recoil accentuates any mechanical problems inside a scope, and quickly separates pretenders from contenders.